


Hello, codeforces!
Do you have modern GPU and CPU and want to calculate something with them, but you don't know how to do it? Dont be upset, because you can read this blog and run your first GPU program on your AMD/Intel/NVIDIA GPU. I will describe an installation process and then we will dive into the C++ code. As an example, we will calculate a lot of mazes for Bug Game in parallel. For doing this in simple way, we will use library Boost.Compute, which is a C++ STL-style wrapper over OpenCL library. ...
Installation for MacOS (Apple M1 Pro)
As Gosunov said, OpenCL and g++ are pre-installed on MacOS. Everything that you have to do is install Boost with command brew install boost. After this you will be able to compile your program with command g++ -std=c++17 -O3 -I/opt/homebrew/Cellar/boost/1.81.0_1/include -framework OpenCL -o main main.cpp
Installation for Windows
We need to install GCC, Boost and OpenCL. Let's do it with cygwin. Alternative: do it with msys2. Just download the cygwin installer by above link and run installation process. Select www.cygwin.mirror.constant.com as a mirror!
Cygwin installation
Select GCC
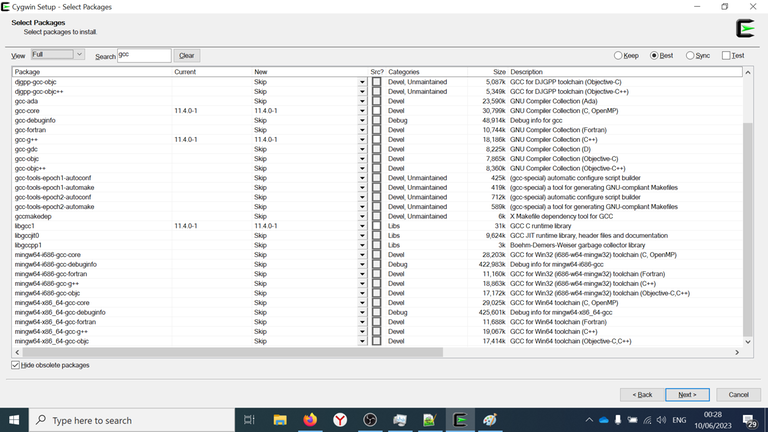
On the step of choosing packages, select View: Full, type Search: gcc and select next packages:
- colorgcc
- gcc-core
- gcc-g++
- libgcc1
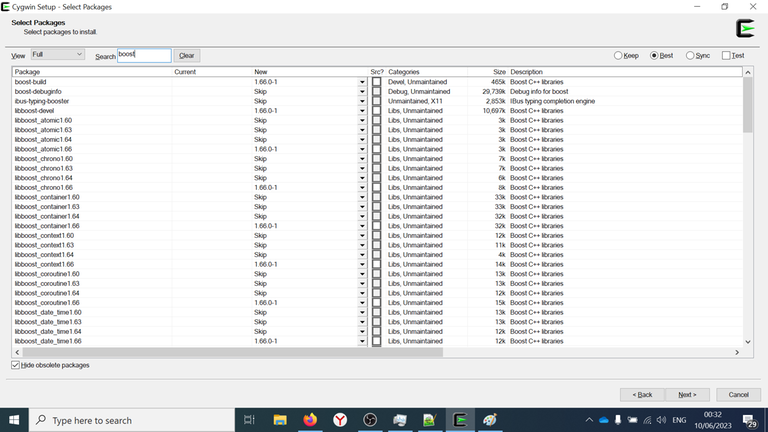
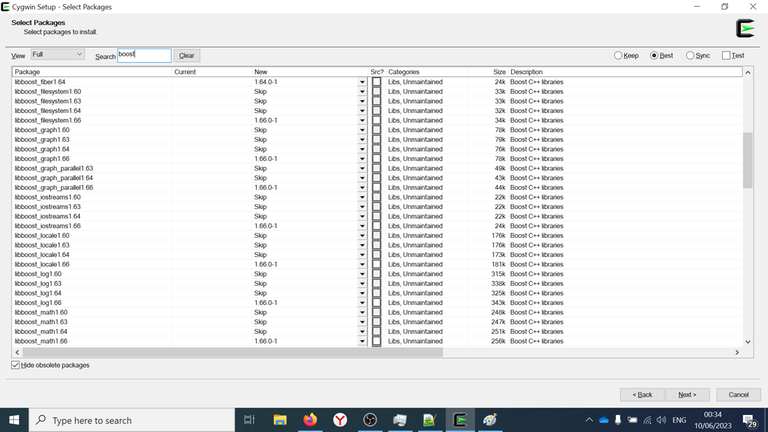
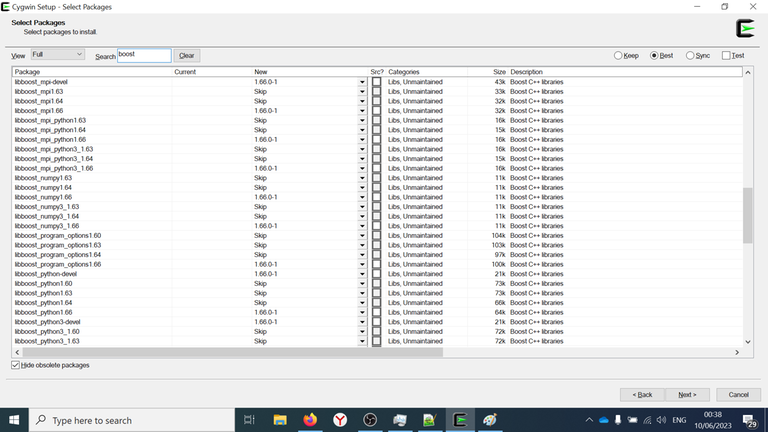
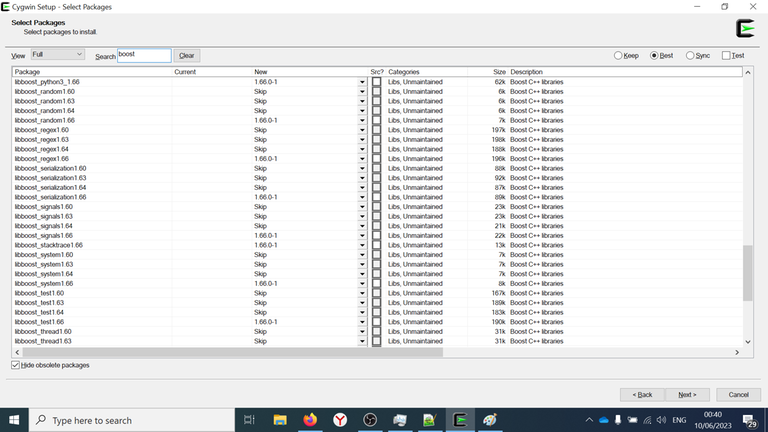
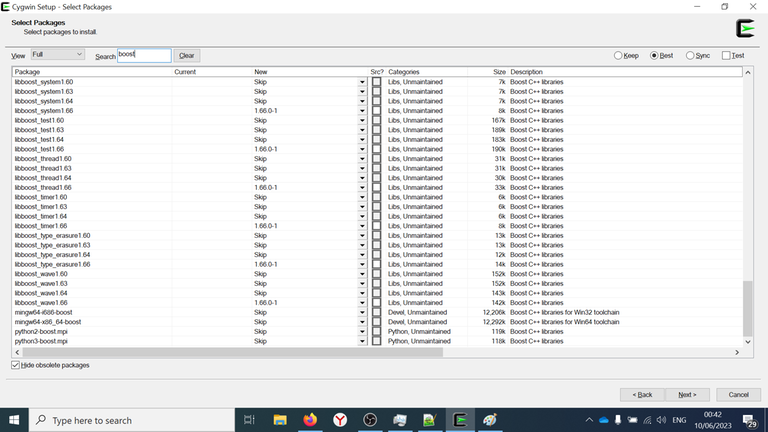
Select Boost
Then type Search: boost and select all of the packages.
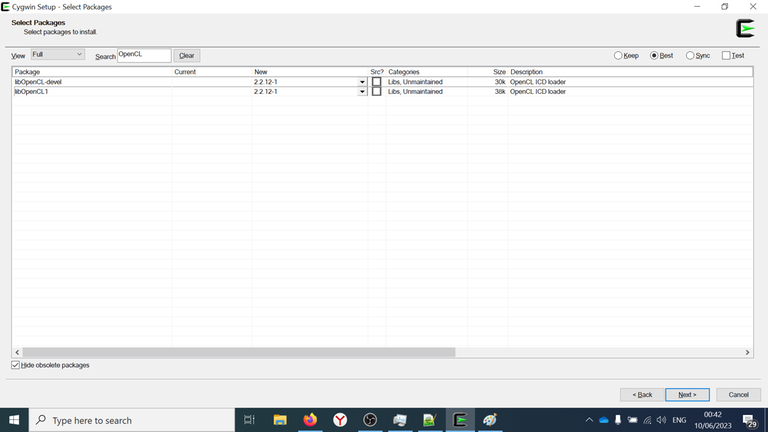
Select OpenCL
Then type Search: OpenCL and select all of the packages: libOpenCL-devel and libOpenCL1.
Finish installation
After selecting all of the packages, click Next twice and wait while the installation process is not finished.
Hello, world!
We are ready to write our first example. Lets print list of available devices. Here is the C++ code:
#include <iostream>
#include <iomanip>
#include <boost/compute/core.hpp>

namespace compute = boost::compute;

std::ostream &operator<<(std::ostream &os, const compute::device & device)
{
    return os << device.name() << " (platform: " << device.platform().name() << ")";
}

int main()
{
    // cycle over all of the devices:
    std::cout << "List of available devices:\n";
    for (int i = 0; auto device : compute::system::devices())
        std::cout << std::setw(4) << i++ << ":\t" << device << std::endl;

    // get the default device
    compute::device device = compute::system::default_device();
    std::cout << "\nDefault device:\n\t" << device << std::endl;

    return 0;
}
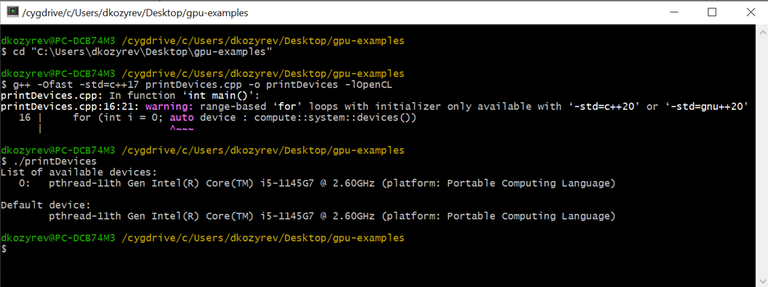
This code will print the list of available devices for Boost.Compute, and will print default device. I saved this code in directory C:\Users\dkozyrev\Desktop\gpu-examples as file printDevices.cpp.
Open cygwin launcher (not installer!) and complete these steps for compilation and running:
cd "C:\Users\dkozyrev\Desktop\gpu-examples"— going into our directory;g++ -Ofast -std=c++17 printDevices.cpp -o printDevices -lOpenCL— compilation and linking;./printDevices— running executable.
Please, pay attention, that on MacOS the compilation command is different: g++ -std=c++17 -O3 -I/opt/homebrew/Cellar/boost/1.81.0_1/include -framework OpenCL -o main main.cpp
You will see the result and will not see your GPU in the list of available devices. Now we are going to install GPU drivers.
Install GPU Drivers
Intel GPU
Google intel opencl sdk and you will see this website. Download and install Intel® SDK for OpenCL™ Applications.

NVIDIA GPU
Google nvidia cuda toolkit. You will see this website. Just download and install!
AMD GPU
Probably, you need to download and install AMD Accelerated Parallel Processing (APP) SDK 3.0. I don't know exactly. Please, see the answer on stackoverflow here.
Copying GPU Drivers to cygwin
If you are using msys2, this step can be avoided (I did some tests on msys2), but when you are using cygwin, it is necessary.
When installation will be finished, you will see the file C:\Windows\System32\OpenCL.dll. Seems that the path is same for any GPU (Intel, AMD, NVIDIA). Open cygwin launcher (not installer!) and complete next:
cp "/cygdrive/c/Windows/System32/OpenCl.dll" "/cygdrive/c/cygwin64/bin/"cp "/cygdrive/c/Windows/System32/OpenCl.dll" "/cygdrive/c/cygwin64/bin/cygOpenCL-1.dll"echo "cygOpenCL-1.dll" > "/etc/OpenCL/vendors/gpu.icd"./printDevices— rerun first example (printing all of the available devices)
You will see, that GPU is available now! I see my Intel(R) Iris(R) Xe Graphics in the list of all devices.

OK, we are ready to calculate something!
Boost.Compute calculation scheme
GPU can process a lot of data simultaneously (in parallel). This is something like processing $$$100.000$$$ independent testcases. There is no profit to run GPU for only one testcase. So, we will use next calculation scheme:
- Create a vector of independent testcases on the host (CPU)
- Copy this vector from the host (from CPU) to a device (to GPU)
- Process all of the testcases in parallel
- Copy a vector of results from device (from GPU) to the host (to CPU)
- Process a vector of results on CPU
Lets start to solve Bug Game on GPU and we will see how it is implemented!
Solving Bug Game on GPU
Please, read problem statement firstly:
Now you know how the Bug moves and what is the maze. Suppose that you are building maze in your code. Some genetic or randomized algorithms, or brute force need to calculate the answer for a whole population (whole set of mazes) independently. This step is costly when population is heavy.
We will create a vector of valid mazes (where the exit is reachable), send this vector to GPU, wait for finish of calculations, copy results and process them.
In this blog we are interested in looking on the performance, so, we will read a maze with 1.488.650 steps from the input file, copy this maze 1.000.000 times and calculate this million of mazes on GPU.
CPU part of program
Reading of the maze from the input file:
    std::ifstream fin(inputFileName);
    if (!fin)
    {
        std::cout << "Can't open the file '" << inputFileName << "'" << std::endl;
        return 0;
    }
    std::vector<std::vector<bool>> f(21, std::vector<bool>(31, 1));
    for (int i = 0; i < 21; i++)
        for (int j = 0; j < 31; j++)
        {
            char ch; fin >> ch;
            f[i][j] = (ch == '#');
        }
Then we need to create a struct for keeping number of visits for each cell. When the Bug's moving finished, the answer is the sum of number of visits for each cell, so we need just to keep the array with number of visits.
Let's create the struct Field:
struct Field
{
    unsigned nVis[21 * 31];
};
We are using 1D array instead of 2D array and data type unsigned (unsigned integer 32-bit data type). Copying from vector of vectors to our new structure:
#define pos2int(r, c) ((r) * 31 + (c))
#define WALL (UINT_MAX)
#define EMPTY (0)
Field setField(const std::vector<std::vector<bool>> & f)
{
    Field a;
    for (int r = 0; r < 21; r++)
        for (int c = 0; c < 31; c++)
            a.nVis[pos2int(r,c)] = (f[r][c] ? WALL : EMPTY);
    return a;
}
Also we need a function for accumulating the answer:
long long accumulateTheAnswer(const Field &f)
{
    long long res = 0;
    for (int i = 0; i < 21 * 31; i++)
        if (f.nVis[i] != WALL)
            res += f.nVis[i];
    return res;
}
Now we need to write a function which will implement the Bug's moving on CPU:
__attribute__((noinline))
void bugMovingCPU(Field &a)
{
    int pos = 1 * 31 + 1, dir = +31;
    while (pos != 618)
    {
        ++a.nVis[pos];
        unsigned val = a.nVis[pos + dir];
        { unsigned next = a.nVis[pos + 31]; if (next < val) dir = +31, val = next; }
        { unsigned next = a.nVis[pos +  1]; if (next < val) dir =  +1, val = next; }
        { unsigned next = a.nVis[pos - 31]; if (next < val) dir = -31, val = next; }
        { unsigned next = a.nVis[pos -  1]; if (next < val) dir =  -1, val = next; }
        pos += dir;
    }
}
This algorithm starts moving from position $$$\left(1,1\right)=1\times 31 + 1$$$ and while the exit is not reached (pos is not equal to $$$\left(19,29\right)=19 \times 31 + 29 = 618$$$), we are calculating minimal value among adjacent cells in order DOWN-RIGHT-UP-LEFT and doing step in minimal direction.
I added attribute noinline: this keyword will prohibit in-lining of this function. The performance test will not be affected by GCC optimizations (otherwise GCC may decide to calculate the answer once and copy the answer n times).
Yeah, we are starting with GPU part now.
GPU part of program
Firstly, GPU (OpenCL library) should be familiar with our struct Field. It can be done with next macro:
BOOST_COMPUTE_ADAPT_STRUCT(Field, Field, (nVis))
You need to write the name of structure twice and then you need to list out all members of structure. In this example we have only one member nVis.
We need to include a new header file #include <boost/compute/types/struct.hpp> for working with structures.
Secondly, you need to write the function which will calculate the maze on GPU:
BOOST_COMPUTE_FUNCTION(Field, bugMovingGPU, (Field a),
{
    int pos = 1 * 31 + 1, dir = +31;
    while (pos != 618)
    {
        ++a.nVis[pos];
        unsigned val = a.nVis[pos + dir];
        { unsigned next = a.nVis[pos + 31]; if (next < val) dir = +31, val = next; }
        { unsigned next = a.nVis[pos +  1]; if (next < val) dir =  +1, val = next; }
        { unsigned next = a.nVis[pos - 31]; if (next < val) dir = -31, val = next; }
        { unsigned next = a.nVis[pos -  1]; if (next < val) dir =  -1, val = next; }
        pos += dir;
    }
    return a;
});
We will use the same code, as we used above. Parameters of macro BOOST_COMPUTE_FUNCTION:
Field— return value;bugMovingGPU— name of a new function;(Field a)— the list of arguments of this function;- The body of this function.
After reading of the field, in the function main we need to detect GPU device, create a context for this device and create a command queue for sending jobs. We will use default device.
    compute::device device = compute::system::default_device();
    compute::context context(device);
    compute::command_queue queue(context, device);
An alternative: you can iterate over all of the devices and pick one which you want to use or you can use all of the GPUs (if you have a lot of them), but, I think, that you will need to create different queues and contexts.
Lets create and fill the vector of mazes on CPU (the host's vector):
std::vector<Field> host_vector(nFields, setField(f));
Create vector of mazes on GPU (the device's vector) and copy from CPU to GPU:
    // create a vector on the device
    compute::vector<Field> device_vector(host_vector.size(), context);

    // transfer data from the host to the device
    compute::copy(host_vector.begin(), host_vector.end(), device_vector.begin(), queue);
We need to use data structures and algorithms from Boost.Compute library. This is why we are creating compute::vector (second argument is device's context) and using compute::copy algorithm (4-th argument is created device's command queue). Don't forget #include <boost/compute/container/vector.hpp>
Boost.Compute will perform copying of the data from CPU to GPU. If you need an asynchronous copying (you may want to do something useful on CPU while copying of data), you can use compute::copy_async like in this example from Boost.Compute manual.
Now we are ready to calculate the answer on GPU for each field. We can use function transform:
    // calculate the answer for each field on GPU:
    compute::transform(
        device_vector.begin(), device_vector.end(), // input range
        device_vector.begin(), // begin of output range
        bugMovingGPU, queue // the lambda function which will be applied to each maze, and device's queue
    );
This function is an equivalent to C++ STL std::transform. See description on cppreference. You can use your lambda function as $$$4$$$-th parameter. This function will be applied to each element from the input range. The result will be written to the output range. Don't forget #include <boost/compute/algorithm/transform.hpp>.
Probably, you can use compute::for_each too, but I was not able to do this, because GPU can't work with references to data (Field &f) or I don't know how to do it...
And then, you can copy the results from device to host:
compute::copy(device_vector.begin(), device_vector.end(), host_vector.begin(), queue);
Then we will need to measure runtime. I'm using the library std::chrono for it. You can see some details in the source code.
Fixing the bug in Boost.Compute 1.66 header by yourself
When you will try to compile the program in cygwin, you will get a compilation error:
In file included from /usr/include/boost/compute/detail/meta_kernel.hpp:37,
                 from /usr/include/boost/compute/types/struct.hpp:26,
                 from gpu-example.cpp:6:
/usr/include/boost/compute/memory/svm_ptr.hpp: In member function ‘boost::compute::context& boost::compute::svm_ptr<T>::get_context() const’:
/usr/include/boost/compute/memory/svm_ptr.hpp:131:16: error: binding reference of type ‘boost::compute::context&’ to ‘const boost::compute::context’ discards qualifiers
  131 |         return m_context;
This is because an author of Boost.Compute forgot about const in one place.
You need to fix this error by yourself or download a fixed file svm_ptr.hpp and replace it. Please, download mine svm_ptr.hpp file.
Suppose, that you saved this file as C:\Users\dkozyrev\Desktop\gpu-examples\svm_ptr.hpp. Open cygwin launched and complete the command cp "C:\Users\dkozyrev\Desktop\gpu-examples\svm_ptr.hpp" /usr/include/boost/compute/memory/svm_ptr.hpp.
Compilation and running
Take this C++ file and save it as gpu-example.cpp. Also save the 1.488.650 maze as 1.488.650.txt.
Windows compilation
Open the cygwin launcher and complete next:
cd "C:\Users\dkozyrev\Desktop\gpu-examples"g++ -Ofast -std=c++17 -DBOOST_COMPUTE_DEBUG_KERNEL_COMPILATION gpu-example.cpp -o gpu-example -lOpenCL
The macro BOOST_COMPUTE_DEBUG_KERNEL_COMPILATION is needed to print the compilation log from the GPU device.
MacOS Apple M1 Pro compilation
cd "your directory"g++ -std=c++17 -O3 -DBOOST_COMPUTE_DEBUG_KERNEL_COMPILATION -I/opt/homebrew/Cellar/boost/1.81.0_1/include -framework OpenCL -o gpu-example gpu-example.cpp
Running
Firstly, you can run $$$1$$$ field calculation with command ./gpu-example 1 "1.488.650.txt". If everything is OK, you can try to run from $$$1024$$$ to $$$10000-1000000$$$ fields.
I will show GPU performance in the bottom of this blog.
Adding CPU multi-threading
While GPU will be very busy, CPU will do nothing. We can fix it by completing some jobs on CPU too. From the main thread we will create few threads. Each thread will calculate own lambda function. This lambda function will do some calculations while GPU is still working.
    // start CPU jobs by creating vector of threads, each of them will do some work independently
    const int nCPUThreads = std::thread::hardware_concurrency();
    std::atomic<bool> gpuFinished{false};
    std::vector<std::thread> threads;
    std::vector<std::deque<Field>> cpuResults(nCPUThreads);
    for (int id = 0; id < nCPUThreads; id++)
        threads.emplace_back([threadId = id, &gpuFinished, &f, &cpuResults]()
        {
            while (!gpuFinished)
            {
                // requesting new field:
                Field currField = setField(f);
                // calculating new field:
                bugMovingCPU(currField);
                // adding this field in a vector of results:
                cpuResults[threadId].push_back(currField);
            }
        });
In above code we use std::thread::hardware_concurrency() for requesting how many threads can work at the same time on CPU. Then we are creating the atomic boolean variable gpuFinished for checking if GPU calculations have been finished or not. Then we are creating the vector of threads and the vector of cpu results. Each thread will have own storage for storing results of its work. This is needed for avoiding the situation when two or more threads use same vector and override same vector's element (avoid Data Races).
We are using emplace_back instead of push_back for vector of threads, because std::thread can't be copied.
In the context scope of the lambda function we are capturing references to shared (between threads) data (gpuFinished, f and cpuResults) and are creating constant int threadId — we will use this as an index in vector.
These threads will work while we will not change value of gpuFinished in the main thread. We will change it when GPU finished (after copying of results from device to host):
    // GPU has been finished here:
    gpuFinished = true;

    // waiting while threads are not finished:
    for (auto &t : threads)
        if (t.joinable())
            t.join();
In last $$$3$$$ lines we are joining created threads to main thread. This means, that the main thread will wait when other threads will be destroyed. Otherwise it is possible that the main thread finished earlier than other threads.
CPU multi-threading bonus
Running GPU + CPU calculations
Let's run this example. Save the code as gpu-cpu-example.cpp. Also download the maze and save as 1.488.650.txt. Place everything in the same directory.
MacOS Apple M1 Pro
The command of compilation: g++ -std=c++17 -O3 -I/opt/homebrew/Cellar/boost/1.81.0_1/include -framework OpenCL -o gpu-cpu-example gpu-cpu-example.cpp
Command $$$1$$$: ./gpu-cpu-example 128 "1.488.650.txt"
Command $$$2$$$: ./gpu-cpu-example 10000 "1.488.650.txt"
Command $$$3$$$: ./gpu-cpu-example 100000 "1.488.650.txt"
Command $$$4$$$: ./gpu-cpu-example 1000000 "1.488.650.txt"
So, we achieved $$$22$$$ billions moves per second on Apple M1 Pro and gcc is faster than clang. Statistics has been provided by Gosunov.
Windows + NVIDIA GeForce GTX 1660 Ti
Commands:
cd <your directory>g++ -Ofast -DBOOST_COMPUTE_DEBUG_KERNEL_COMPILATION gpu-cpu-example.cpp -o gpu-cpu-example -lOpenCL |& tee out.txt./gpu-cpu-example 1000000 "1.488.650.txt"
The speed is 28.501.609.181/s, provided by sziiza.
Comments: probably, you need to disable integrated GPU in Windows before running. Otherwise, NVIDIA will not be chosen as a default device. Or you need to rewrite the code.
Also, sziiza calculated his $$$137$$$ millions maze 1.000.000 times! Got same performance. Such calculations takes $$$5451$$$ seconds. He did 157.345.095.570.802 operations with speed 28.865.081.470/s.
Windows + NVIDIA GeForce RTX 3070 Laptop GPU
Instructions are the same to previous one. mz1 used his own 11.818.688.txt maze. Also he disabled integrated GPU.
Speed is 48.483.623.775/s — the winner.
Windows + Intel(R) UHD Graphics 620
Command $$$1$$$: ./gpu-cpu-example 1000 "1.488.650.txt".
Command $$$2$$$: ./gpu-cpu-example 10000 "1.488.650.txt"
Failed on Windows + Intel(R) Iris(R) Xe Graphics
Intel(R) Iris(R) Xe Graphics skipped some fields and decided do not calculate them. Probably, something wrong with driver/setup, but I can't resolve it. GPU ops have to be1.488.650.000, but they are 1.143.283.200. Debugging shows that elements [0,255] and [512,767] has been calculated, while [256,511] and [768,999] are skipped. Any ideas how to resolve?
Other examples
You can read full Boost.Compute Tutorial and try all of the examples here. Then you will still have some questions like "How to use long long as return type?" you can see examples in a directory boost/compute/test on the github. You can find the testing of for each Boost.Compute method here, reproduce them and see how long long or your own structures can be registered and used.
P.S. If you are able to test written code on your GPU/CPU, please, write your results in comments.


That's very helpful, thank you!