Interactive problems are rare problems in competitive programming. I think that interactive problems are hard to solve for many guys. Because, testing for your solution is too hard. When testing interactivity, it is necessary to understand the stdin/stdout on your system. In this article, we will cover the following topics,
- Basic code for interactive problems. How to do printf debugging. How to do testing by sample file.
- The
mkfifothat you often see in CodeForces user articles. mkfifo does not work on WSL1 as it is, but we will make it work on Windows with WSL1. - Colorful Result
- (option) Use zsh + coproc to test without generating intermediate files.
- The following examples are all in Python, but will work equally well in C++.
Similar articles can be found below.
eku's article This is introduction to useful tools (github) for interactive problems. (eku)
Gassa's Comment and tools This is introduction to useful tools (github) for interactive problems.(Gassa)
pikomikan's article The approach is similar to this article.
article by bartkaw This article describes how to call a solution function directly from an interactor program.(bartkaw)
Terminology
In this article, we call it as follows
- Solution: the program solve the problem (such as your submited program)
- Interactor: the program that responds to the submitted program. (such as CF's judge program and your local program)
Preparation: Problems and examples to work with
This article use CodeForces problem for describing. It is a simple number guessing game. Guess the number $$$0 \leq n \leq 10^5$$$. When you enter a number(Solution send a number to Interactor), Interactor will return "<" or "$$$\geq$$$". You can use the result to find n(target number) and output "! n is output.
In many case, you have to write the Interactor for yourself. However, many interactive problems are simple to implement. (Maybe)
Implementing an interactor
Implementing the solution
You can also use CodeForces example.
The idea of connecting an Interactor to a Solution
In some CodeForces posts, it is suggested to use mkfifo fifo; (. /solution < fifo) | (. /interactor > fifo) for Interactive problem testing. The concept is the same in this article. Usually, when we run a single program, STDIN is sent to you program by input() and the print() output is sent to us (our terminal) as stdout. This is shown in the left figure below.


When testing the solution, we will connect the interactors and the STDIN/STDOUT of the solution to each other to make sure it works well as the right figure above.
(Windows only) Problems using mkfifo
CodeForces and some google results articles use mkfifo, but when I try to run it on Windows WSL1 ubuntu, I get the following.
$ mkfifo fifo; (python3 49490_interactor.py < fifo) | (python3 49490_sol.py > fifo)
 > mkfifo: > cannot create fifo 'fifo': Operation not permitted
 > // Same result when running as sudo(root)
Windows WSL has restrictions on where you can mkfifo (this command create a pipe file), so you can do this command with file path to /tmp or /var/tmp as following.
$ rm /tmp/fifo && mkfifo /tmp/fifo && (python3 49490_sol.py < /tmp/fifo) | python3 49490_interactor.py > /tmp/fifo
 > (Nothing is printed out. But the error is gone.)
Using mkfifo and duplicating standard output
You can run the above command with mkfifo. But you don't get nothing. You won't know whether it succeeded or failed! How to solve it ? This is because all STDOUT of the Interactor has been moved (redirected) to the Solution by pipe(|) and redirect(<>) , and all STDOUT of the Solution has been moved to the Interactor. So you can see nothing as output.
So you should use the shell feature >&. This allows you to `copy' the output. The image looks like this

Even if you use pipes or redirects for copying from STDOUT to STDERR, STDERR will still be displayed to the user (by default). a>&b can copy specify a file descriptor with a=from, b=to. - memo: file descriptor numbers, [0: stdin] [1: stdout] [2: stderr]
$ rm /tmp/fifo && mkfifo /tmp/fifo && (python3 49490_sol.py < /tmp/fifo) 1>&2 | python3 49490_interactor.py > /tmp/fifo 1>&2
500001
It's done! You will see that each command has a 1>&2, which means that STDOUT of both programs will be printed to STDOUT and STDERR(because STDOUT is mirrored to STDERR). Then, you can see both conversations.
How to do printf debug
Although it is possible to debug by viewing only both conversations. Sometime, you want to see more detailed debug information Solution and Interactor. For example, you want to do the following printf debugging.
- In the Solution, we want to print the mid value every loop
- In the Interactor, we want to print the raw input and answer number.
However, if you simply use print(), the debugging message will also be send to the other program, causing input errors in both programs. So, we will use STDERR. Let's try it.
while l ! = r:
    mid = (l+r+1)//2
    print("new mid:", mid, file=sys.stderr) # NEW! this cmd print msg to STDERR
If you are using C++, use std::cerr instead of std::cin. Example run with ``shell:stderr'' output.
# Command is the same as before
$ rm /tmp/fifo && mkfifo /tmp/fifo && (python3 49490_sol.py < /tmp/fifo) 1>&2 | python3 49490_interactor.py > /tmp/fifo 1>&2
As you can see, the user can see "new mid:11", but it is seen by only you, it wasn't seen by the Interactor.
Automating the test
Next, we'll show you 1. how to judge AC or WA and 2. replace testcase in the Interactor.
Judging AC or WA by shell
Use the return value of the Interactor program. In an interactor, you should return 0 on success and non-zero on failure.
$ rm /tmp/fifo && mkfifo /tmp/fifo && (python3 49490_sol.py < /tmp/fifo) 1>&2 | python3 49490_interactor.py > /tmp/fifo 1>&2
  > (snip)
$ echo $[question mark]
  > 0 (returncode)
    note: [question mark] means `?`
If you connect commands with a pipe, shell will return only the return value of the command you executed for the last command. That is, the return value of python3 49490_interactor.py goes into $?.
Now, to make sure the return value is working properly, we will do WA manually.
$ python3 49490_interactor.py
  > ! 11111
  > NG!
$ echo $[question mark]
  > 20 (returncode)
    note: [question mark] means `?`
As you can see, the return value has changed(not 0). The success or failure of the result can be recognized by the shell or external programs by using this.
Implementing the prepared test set
Now, when you solve problems, you want to use various data sets, and it is hard to rewrite the course code of the interactors every testcase. The Interactor need to be able to fetch testcase from the outside. There are several approaches to this, typically 1. enhance the Interactor and input data at program execution time 2. the Interacter open and read an external file.
In this case, we will use 1, which requires some change of the Interactor. First it will read lines of testcase as shown below. After that, it will read input from the Solution.
Here is an example of how it works manually.
$ python3 49490_interactor_custom.py
OK. However, how do we load the data from testcase file? Create a test file 5.in that sets the answer to 5, as follows(this file has only 1 line)
5
To run it, do the following
rm /tmp/fifo && mkfifo /tmp/fifo && (cat 5.in ; python3 49490_sol.py < /tmp/fifo) 1>&2 | python3 49490_interactor_custom.py > /tmp/fifo 1>&2
It's done! The key here is cat 5.in ; python3 49490_sol.py. This means that the result of cat is first input to the Interactor, and then the input of the Solution is send to the interactor.
Appendix: Making the output easier to read(Colorful Output)
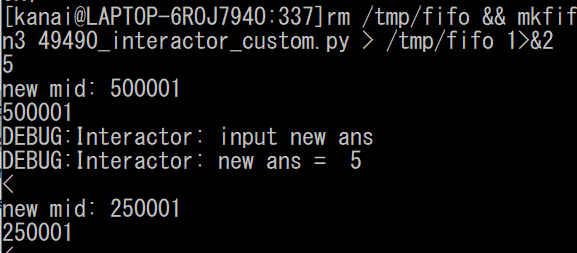
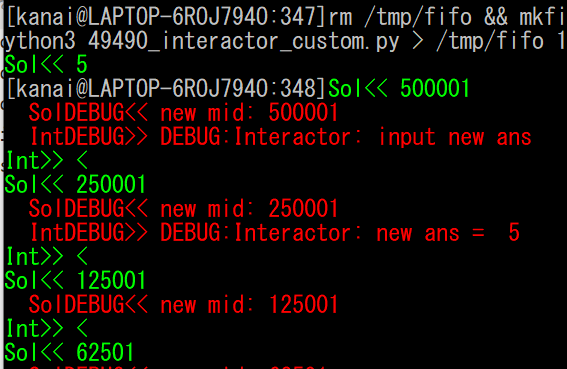
By the way, output lines are a little hard to see when debugging, so we want to make it colorful. For example, I want it to look like the following figure on the right.


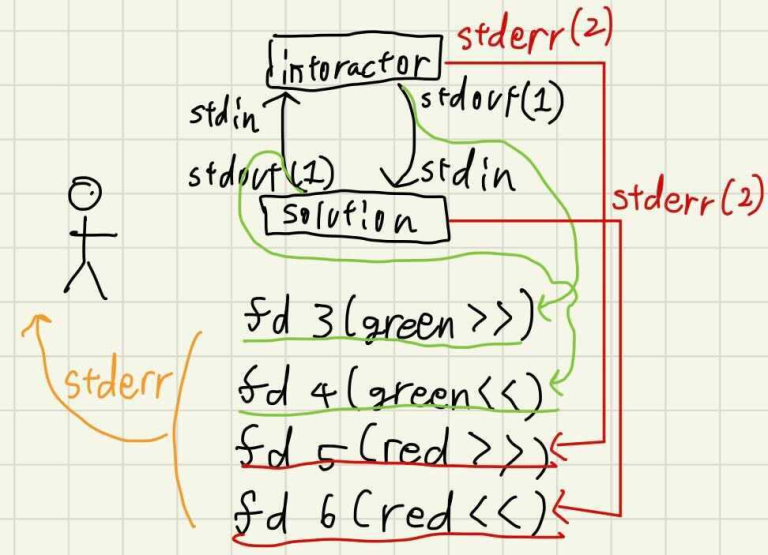
This can be easily achieved by providing descriptors other than $$$0,1,2$$$. zsh and other shell allow you to send file descriptors to any command by executing exec n>. Write an escape sequence and commands to decorate the received string, and prepare file descriptors $$$3,4,5,6$$$ as follows.

Using this information as a guide, run the command as follows
With 1>&4 2>&6 and 1>&3 2>&5, we were able to map and achieve the above output.
Appendix: Using coproc (zsh)
In zsh and bash, you can use shell functions to flexibly redirect file descriptors between processes without using mkfifo. Using coproc, you can achieve the following. This means temporary file is not necessary by pipe.
Is it ok to submit with STDERR?
CodeForces ignore STDERR. But print stderr is using I/O so it is too heavy command. You should remove this kind of instruction. https://mirror.codeforces.com/gym/101021/submission/102884952
Appendix: sample code: CF Good Bye 2019 1270D - Strange Device
Here is an example implementation of the interactor and solution for this Interactive problem, as well as an execution example.
Link
Thanks
For most of the translation, DeepL helped me.


